Table View Business Rule Example
This is an example only for the purpose of outlining the basic elements of a Table View Business Rule. By default, a Table View is “read only”. A Spreadsheet Business Rule can be defined to return a complete table. Always consider the size and content of the table as it may impact performance. Elements that can impact performance, such as exceeding the ability to render the Table View, are the total number of rows as well as the content within the records.
GetTableView Function Type
Database Connection
Create connections to sources, such as a database table using business rules.
Dim sql As New Text.StringBuilder()
sql.AppendLine("Select * ")
sql.AppendLine("From Employees ")

'Create and fill the data table
Dim dt As DataTable = Nothing

Using dbConnApp As DbConnInfo = BRApi.Database.CreateApplicationDbConnInfo(si)
    dt = BRApi.Database.ExecuteSql(dbConnApp, sql.ToString(), False)

    If Not dt Is Nothing Then dt.TableName = "ContentList"
End Using
Determine if the Table View Requires Write-Back
If the Table View must write-back to a target database or table, the CanModifyData property must be set to True.
Dim tableView As New TableView()
tableView.CanModifyData = True
Define the Table View Columns
Table columns can be returned for the entire table, or as distinct items. When columns are defined, they can be returned to the Table View using an alias description as part of a Header section.
' Create columns on Table View
    ' Create a column header row
    Dim tableViewRowHeader As New TableViewRow()
    ' Return all columns from the data table
    For Each dataColumn As DataColumn In dt.Columns
        Dim column As New TableViewColumn()
        column.Name = dataColumn.ColumnName
            'Rename the table column
            If column.Name.Equals("Employee_Status") Then
                column.Value = "Status"
            Else
            'Return the table column name
                column.Value = dataColumn.ColumnName
            End If
        column.IsHeader = True
        tableView.Columns.Add(column)
        'generate column headers based on the column name
        tableViewRowHeader.Items.Add(column.Name, column)
    Next dataColumn
    tableView.Rows.Add(tableViewRowHeader)
Create a nested, parameter-driven combo box in a Table View column by adding the following code to your business rules:
TableViewColumn tableViewColumn1 = oTableView.CreateColumn("ParamName1", "Column1", true, "Default.[pf8_1322_delimited_h_path_1]", true);Returning Rows to the Table View
Each row cell is evaluated from the data table columns. The designer has full control over the display of the content of the table using Business Rule functions. In the example below, the presentation of the results will vary by column, by user using the BRAPI Security Authorization function.
' Create Data Row Records
For Each dataRow As DataRow In dt.Rows
    Dim tableViewRow As New TableViewRow()
        For Each tableViewColumn As TableViewColumn In tableView.Columns

            Dim column As New TableViewColumn()
            Dim columnValue As String = ""
            column.Name = tableViewColumn.Name
            columnValue = dataRow.Item(tableViewColumn.Name)
            'Condition to limit view of results to only Administrators
            If column.Name.Equals("SSN") Then
                If Not BRApi.Security.Authorization.IsUserInAdminGroup(si) Then
                    columnValue = "XXX-XX-" + column.Value.Substring(7,4)
                End If
            End If
        End If
        column.Value = columnValue
        column.IsHeader = False

        tableViewRow.Items.Add(tableViewColumn.Name, column)
    Next tableViewColumn
    tableView.Rows.Add(tableViewRow)
Next dataRow

Return tableView
Security Filtering Results


Add New Records
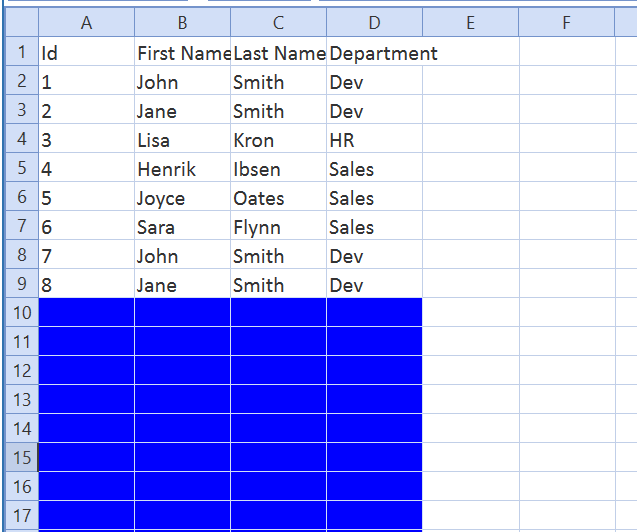
Add new records to a table by assigning a specific range of editable rows at the bottom of the Table View, which can be used by rules to commit the records into a table. Format the background area with a fill color to visually indicate the area is enabled for adding new records.
Use the Insert Rows feature to insert empty rows into a table and change the background color.
-
CanModifyData: Set to True to False to determine if the table can contain empty rows.
-
NumberofEmptyRowsToAdd: Set the number of empty rows to add.
-
EmptyRowsBackgroundColor: Set the color of the background.
Dim tableView As New TableView()
tableView.CanModifyData = True
tableView.NumberOfEmptyRowsToAdd = 10
tableView.EmptyRowsBackgroundColor = XFColors.Blue
The following example shows the business rule applied to the table.
DataType Object for Column Fields
If you do not specify a data type, it will default to Text.
'Add Columns to the Table View
tableView.Columns.Add(CreateTableViewColumn("Id","Id", True))
tableView.Columns.Add(CreateTableViewColumn("First", "First name", True))
tableView.Columns.Add(CreateTableViewColumn("Last", "Last Name", True))
tableView.Columns.Add(CreateTableViewColumn("Department", “Department", True))

Dim salaryColumn = CreateTableViewColumn("Salary", "Salary", True)
salaryColumn.DataType = XFDataType.Decimal
tableView.Columns.Add(salaryColumn)
In the example below, the Salary column is rendering the Table View Column fields as numeric values to accurately reflect their nature and will support Spreadsheet based calculations.

Enable Status Column
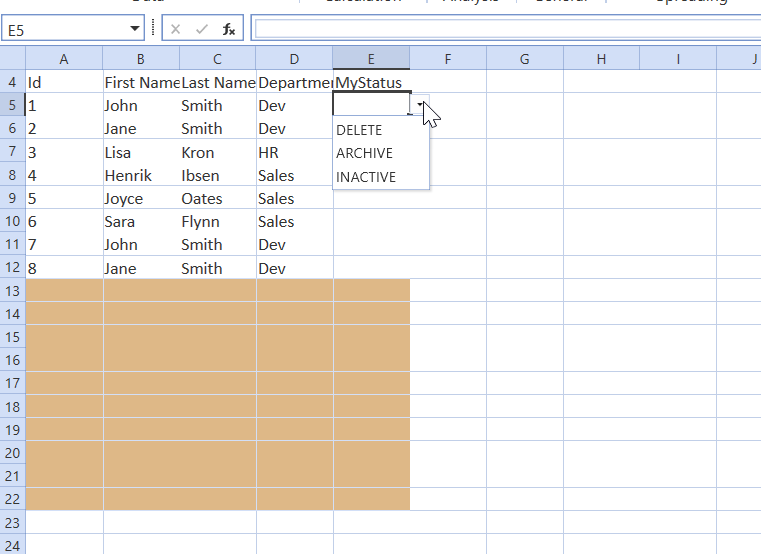
The Table View Business Rule can create a dedicated status column. In the example below, it is My Status column. Use this to classify records for use in conditional business rule logic to drive behaviors.
In this example, the business rule can define members for a drop-down list defined as Delete, Archive, and Inactive. The designer creates business rules to perform actions based on the status of the records, such as delete, or archiving to another table.
Use the Enable Status Column option to manage records for your table.
-
statusColumnEnabled: creates a status column in the table view when set to True.
-
statusColumnName: string defines the name of the column. If left blank, the default name “XFTV_Status” will be assigned.
-
statusColumnIndex: zero-based integer identifies the column where the status is created. A value above the actual number of columns will assign the Status as the last Column. A negative number wil assign the Status column as the first column.
-
statusColumnValues: creates a list of members to select as a validation in the Status column. It is a hidden range at the top of the Table View. If left blank, no list or validation will automatically be created in the Status column, it will need to be created manually by the designer.
‘If multiple SetCustomStatusColumn statements are set on the same table view, it will take the last statement.
tableView.EnableStatusColumn(True, statusColumnName, 4, “DELETE,ARCHIVE,INACTIVE“)
In the screenshot below, notice the Delete, Archive, Inactive, which is entered in the business rule.
Write Back
If the GetTableView Function Type is modified to set the Table View property CanModifyData as True, the SaveTableView Function will execute. This section is used by the designer to define which records should write back to the target. The target table does not have to be the same as the source table.
Control conditions should be designed into the write-back rules for efficiency and performance. For example, Member Functions, such as IsDirty() can be incorporated to write only the modified members within the writeable records.
Member Functions
-
IsDirty– Condition Check if the item has been modified
-
IsHeader– Member record status as a Header record.
-
Name– Member label of the data table. Will not reference an alias label.
-
OriginalValue– Condition reflects last stored value prior to the Table View refresh
-
Value– Reflects the current value present on the Spreadsheet Table View. This can be a changed, unsaved value.
Dim sql As String
Dim Id As String
Id = ""
Dim department As String
department = ""
Using dbConnApp As DbConnlnfo - BRApi.Database.CreateApplicationDbConnlnfo(si)
    For Each tableViewRow As TableViewRow In tableView.Rows
        If tableViewRow.IsHeader = False
            For Each tableViewColumn As TableViewColumn In tableView.Columns

                If tableViewColumn.Name = "Id"
                    Id = tableViewRow.Item(tableViewColumn.Name).Value
                End If

                If tableViewColumn.Name = "Department"
                    Dim tableViewCellDepartment As TableViewColumn
                    tableViewCellDepartment = tableViewRow.Item(tableViewColumn.Name)

                    If tableViewCellDepartaent.IsDirty() Then
                        department = tableViewCellDepartment.Value
                        Else
                        department = ""
                    End If
                End If

            Next tableViewColumn
                If Not String.IsNullOrEmpty(department) Then
                    sql = "Update Employees Set Department = '" & department & "' Where Id = " & Id & " "
                    BRApi.Database.ExecuteSql(dbConnApp, sql, False)
                End If
        End If
    Next tableViewRow
End Using
Create Table View From Data Table
You can create a Table View from Data Table using the Table View PopulateFromDataTable function. The new function has two additional Boolean properties to include a Header Row and to utilize the Data Table's Data Type. The function is able to utilize any Data Table, including those from Dashboard Data Adapters using the GetAdoDataSetForAdapter function.
Properties:
-
tableView.PopulateFromDataTable(data Table , Include Header Row, Include Data Types)
Column Format Object
The ColumnFormat Object allows the Table View Designer to format the content area of a column, while excluding the Column Header for use as a separately formattable column header using the HeaderFormat object.
tableView.Columns(1).ColumnFormat.ColumnWidth = 15
-
BackgroundColor
-
ColumnWidth
-
FontFamily
-
FontSize
-
IsBold
-
IsItalic
-
IsUnderlined
-
TextColor
-
NumDecimals
-
AsPercentage
Header Format Object
The use of the HeaderFormat Object requires the PopulateFromDataTable to include a header or a scripted data table to define a TableViewRow as IsHeader=True. This function allows a column headers to be formatted as a row using all the formatting options except NumDecimals and AsPercentage.
tableView.HeaderFormat.BackgroundColor = XFColors.Navy


